Reestablishing an IPsec tunnel between OPNsense and UniFi Security Gateway after your IP address changes
On Friday, September 4, 2020, Comcast Xfinity experienced an outage here at home from about 1 PM to about 9 PM. Whatever happened was so severe that even my mobile service lost all data networking as well, meaning, I was only able to call and text using regular SMS. My current, unsubstantiated theory is that somebody, somewhere managed to cut a fiber line that serviced both and managed to knock out everything. The outage appeared to be localized around where I live as others in the city did not have an interruption but lasted long enough that my normally stable public IP address changed when service was restored. This post covers reestablishing my IPsec tunnel between my colocated server and my home network and really exists, so I have an easy to follow guide™ in connecting the tunnel after my public IP address changed.
In a yet-to-be-written post detailing my current local and hosted setup,
this post covers the steps I took to get the IPsec tunnel back up and
working. The examples below are removing an old IP address of
1.1.1.1 and replacing it with the new IP address of 1.1.1.2.
Granting access to VMWare ESXi
The ESXi server is set up to allow SSH access with public key authentication only, so it does not have an IP allow list configured. This is quite fortuitous as it gives me a steppingstone to get back in without opening a support ticket with my hosting service. The main step here was to SSH in to the ESXi host, remove the old IP address and add the new IP address to grant access to the web services. The ESXi host is running 6.7, so the steps may be different on ESXi 5 or 7.
[home]% ssh esxi.host
# authenticate via public key

[esxi]% esxcli network firewall ruleset allowedip list --ruleset-id=vSphereClient
Ruleset        Allowed IP Addresses
-------------  --------------------
vSphereClient  1.1.1.1

[esxi]% esxcli network firewall ruleset allowedip remove --ruleset-id=vSphereClient --ip-address=1.1.1.1
[esxi]% esxcli network firewall ruleset allowedip add --ruleset-id=vSphereClient --ip-address=1.1.1.2

# no output is produced with the add/remove commands, so verify the
# change took place
[esxi]% esxcli network firewall ruleset allowedip list --ruleset-id=vSphereClient
Ruleset        Allowed IP Addresses
-------------  --------------------
vSphereClient  1.1.1.2
With that, you can access the ESXi web interface.
Granting access to the OPNsense router
Another appliance in my setup needing an update to the IP allow list is
my OPNsense router, so I can access the configuration interface and
update the IPsec tunnel settings. This requires access to the ESXi web
interface to get console access to OPNsense. Once in the shell, adding
the public IP address to the allowed_config PF table is quite
straightforward.
Do not bother removing the old IP address as any change in OPNsense will replace any changes here, so immediately go and update the rule alias and swap out the IP addresses.
Firewall > Aliases > Edit
allowed_configentry
Edit the alias and remove the old 1.1.1.1 address and add the
1.1.1.2 address and apply the changes. Clear the console and log out.
You are done with ESXi at this point.
Updating configured WAN IP on the UniFi Security Gateway
Due to an incomplete configuration (more on that on the future IPsec setup post) I decided updating the UniFi Security Gateway (USG) would be next on the list since the USG is unable to successfully connect the IPsec tunnel when initiated from the USG to the OPNsense router.
I loaded up the local UniFi Network Controller interface, jumped into the settings section, and updated the "Local WAN IP" with the new public IP address.
Settings > VPN > VPN Connections > Remote Network
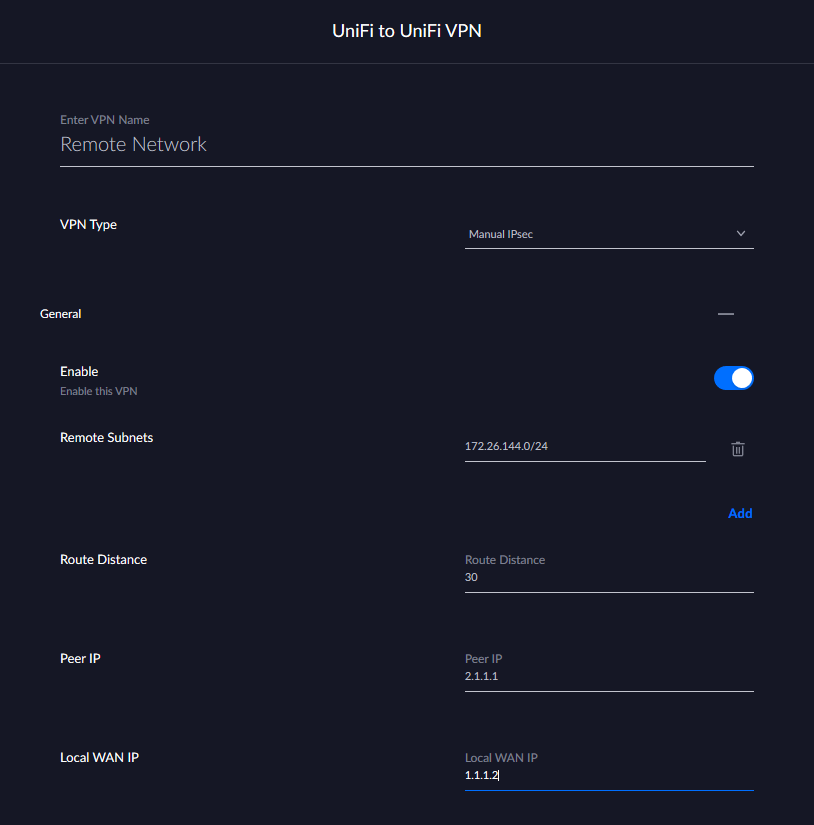
Replace the old WAN IP Address field with the new one and click "Done" at the bottom of the page. While you are working on the other steps, the USG will provision the changes and be ready for incoming IPsec tunnels.
Changing the Remote Gateway address in OPNsense IPsec Tunnel Settings
The last piece of the IPsec tunnel puzzle is to update the Remote Gateway IP address configured in the OPNsense IPsec tunnel settings. You will need to edit the Phase 1 entry for the IPsec configuration you are updating.
VPN > IPsec > Tunnel Settings > Edit the Phase 1 rule entry
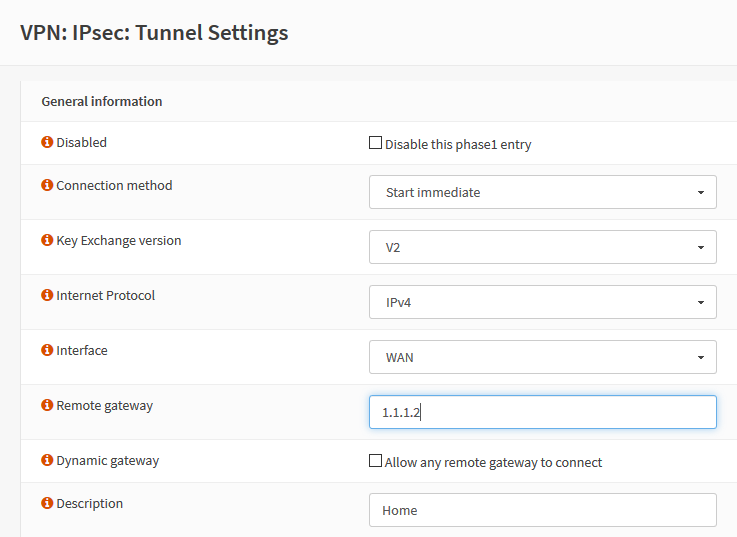
Update the "Remote Gateway" field with your new public IP address, click "Save" at the bottom of the page, and then click "Apply changes" in the upper right of the next page in the notification banner.
Probably Unnecessary Steps
At this point, you are pretty much good to go. With my current configuration, the USG cannot initiate the connection to OPNsense (for some reason, it attempts to use a certificate to authenticate when it should be using a Pre-Shared Key) so I initiate the connection from OPNsense by navigating to VPN > IPsec > Status Overview and clicking the play icon on the IPsec tunnel to restart the connection. Now, since everything is reconfigured correctly it should work.
In my case, the tunnel was set up, but no traffic would route through the tunnel. I could see IPsec packets passing by in the live firewall logs, but no responses were coming back. I double checked other areas to ensure the public IP address did not appear in other potential configuration areas: the configured gateway, and static routes. Everything seemed fine. Since the USG has issues connecting, I tried forcing a provision of the configuration profile, and when that did not fix the issue, I restarted the USG. Much to my surprise, restarting the USG did not fix the issue either.
I double checked the strongSwan
configuration on both sides with the --list-conns and --list-sas
and confirmed they had identical settings (this was a sticking point that
will most likely be detailed in the future post) and monitored the
connection setup with --log, everything appeared to be configured
correctly and the two endpoints were talking and able to ping the
endpoint address on the other side of the tunnel. Running out of options
and about to pull my hair out in frustration, I tried the final thing I
could think of: I restarted OPNsense.
It worked and my IPsec tunnel is back up and operational! My only guess is that there was some residual routing or other configuration left over in OPNsense that even restarting the strongSwan service did not fix. Maybe there was a route left over that could not update? I have no idea. Either way, I hope you will find this guide helpful, and that my future self will check back here the next time my house's public IP address changes.